BUY NOW
Purchasing our awnings online is easy! *Available for standard sizes & colours only (Luxtek range)
Simply click on the product below and then select your chosen size and canvas colour.
Once you have finished making your awning selection, you can view your cart, continue shopping or proceed to checkout.
If installation is required, please contact us directly on 1800 684 548 to discuss further or email us with your project details, location & photos.
For all custom sizes & colours, you will need to contact our team using our 'Contact Us' form or call us on 1800 684 548 to discuss further.
Luxtek Retractable Awning
The Luxtek awning is a full-cassette style, providing maximum protection when not in use, aluminium construction to provide long life and various mounting options.
With its attention to detail, Luxtek is perfect to compliment any project, combining aesthetics and functionality.
These quality awnings are made in Spain and backed by a 4 year warranty.
With our popular standard sizes & colours to choose from, this allows for a quick turn around of 1-2 weeks, as well as providing an economical option for your sunshade solution.

Melbourne & Sydney
Call Us: 1800 684 548
INSTALLATION (LUKTEK FULL-CASSETTE)
The Luktek Full-Cassette retractable awning has various methods of installation which includes wall mount, ceiling mount or rafter mount.
All Luktek awnings are supplied with standard wall mount brackets and optional ceiling or rafter mount brackets are available from our store.
Our video will demonstrate how simple our awnings can be installed on to a brick/concrete wall within a few hours.
Tools required:
-
Hammer/mallet
-
Level
-
Pencil
-
Hammer drill
-
Masonry drill bit
-
Socket set/spanners
-
Ladders
-
Chemset Resin
-
Anchor bolts or threaded rods
Please note: An installation manual is provided with every Luxtek awning and should be read for further technical & operational information.
Wall Installation
Our awnings can be mounted directly on to walls (brick, concrete, steel, timber etc) using our standard wall brackets (supplied with every Luxtek awning), as long as there is adequate structural support. Depending on the type of surface/structure, you will need to use either coach screws (timber), threaded rods or anchor bolts (concrete & masonry) or bolts & nuts (steel or timber).
Please refer to the following drawings which show the required dimensions:


Fascia Installation
Our awnings can be mounted to a fascia using the standard wall mount brackets as long as there is enough height and structural support to carry the load of the awning. If the fascia does not have enough height, an option here would be to attach a new timber beam to the external face, across the length fixing in to the existing structural timber studs and then our awning can be attached to this new beam.
In order to attach our awning brackets to the fascia, coach screws will be required and be fixed in to the structural timber studs and not just in to the fascia board. Additional framework/studs may need to be added internally for support and to accommodate for the 150x150 bracket base plate fixing points.
Please refer to the following drawing which shows a common roof structure/framework:

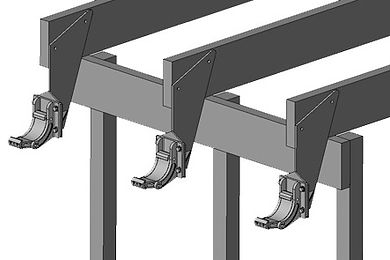
Rafter Installation
Our awnings can be mounted on to rafters using our rafter brackets (available for purchase in our store). The standard wall brackets (supplied with the awning) will attach to the rafter brackets.
In order to install & attach the brackets in to the rafters, you will generally need to remove the roof tiles or roof sheeting to give you access to this area. Once you have located suitable rafters for mounting, you will be required to cut some slots in the eaves to allow the rafter brackets to be brought up through the eaves. Bolts and nuts are generally used for this application to fix the rafter brackets to the rafters, ensuring they are all level across the length of the area.
Once this has been completed, you can attach the standard wall brackets to the rafter brackets and then proceed to install the awning.
Please refer to the below drawing which shows a pergola/rafter structure:
Ceiling Installation
Our awnings can be mounted on to ceilings (concrete, brick, timber etc) using our ceiling brackets (available for purchase in our store), as long as there is adequate structural support.
If installing through the eaves and in to the timber studs, you will generally be required to add additional studs/framework as the existing studs won't be wide enough to accomodate for the 150x150 base plate fixing points.
Please refer to the below drawings & photo showing ceiling mount methods:


Please note: The above information should be considered as a general guide only and Designer Awnings does not take any responsibility or liability for improper installation, damages to property or personal injury. We recommend installation by a licensed tradesman.